This is short review about a tiny place – Bathtub Gin & Co. – a great little watering hole tucked away in a Seattle Belltown alley.

The lower level of Bathtub Gin & Co.

The lower level of Bathtub Gin & Co.

The bar has the feel of a prohibition-era speak-easy – minimalist décor, dark (but not gloomy) interior, shelves full (and I mean brimming) with beautiful bottles of various booze, and a few tables and chairs set up throughout its two tiny floors.  Even the exterior is discrete and you have to keep your eyes peeled for the tiny sign to the right of the nondescript door leading to this lair (located in a street between 1rst and 2nd Avenue).

Unlike a prohibition-era speak-easy, however, you are certainly not drinking moonshine.  The bartender would certainly not stand for it.

Cocktail and the bar's namesake.

Cocktail and the bar’s namesake.

Instead, he has a number of craft cocktails on offer, and if you’re feeling adventurous he’ll ad lib a drink to suit your mood.  And it is this feature that really sets Bathtub Gin & Co. apart from your average bar – the way that the set up and bar staff work together to create a feeling of intimacy and conviviality.

The drinks are all delicious, and there is something for everyone.  Cocktails are about $10 each, but (this being Seattle) there’s a happy hour menu of $7 cocktails.

If you’re in Belltown and in the mood for a special and original experience, look not further than Bathtub Gin & Co.  Just be sure to look hard, or you might miss it.


Bathtub Gin & Co. on Urbanspoon

A delicious baguette sandwich is a beautiful thing – especially when it’s done right.  I was consequently glad to come across Baguette Box in Seattle’s Capitol Hill area, because they do it right and then some.

2014-03-23 11.46.06

The delicious drunken chicken sandwich.

Baguette Box is a no frills, feel-good sandwich place with style.  We arrived right at opening on a lazy Sunday and were greeted by the friendly counter staff who made two great selections – drunken chicken (to foreshadow the next 2 days…?) and a veggie eggplant sandwich. Both were delicious.

The eggplant sandwich was well seasoned and did not have greasiness to it.  The texture was nice, too – smooth and creamy which contrasted with the bread’s crunchy crust.

The drunken chicken sandwich was similarly well executed.  It was spicy but not too spicy.  I appreciated that they didn’t go overboard with the sauce to make the sandwich soggy.  In fact, despite the depth of flavour, the sandwich had a lightness to it.  This was no doubt the result of the fresh ingredients.

In terms of value, Baguette Box is actually pretty good.  A filling sandwich (or rice bowl) rings in just under $8.  Oh…and did I mention that they serve beer?  I would definitely recommend this place for a pit stop on your way to Capitol Hill from Seattle downtown – a great spot to recharge, or load up on picnic goodies for a sunny summer day.

Baguette Box on Urbanspoon

Every time I come to Seattle, I come to Japonessa, a sleek and cheerful downtown sushi restaurant with a twist.  I am never disappointed, as Japonessa does a lot of things right.

Eel Cucumber Sushi and Salad

Eel Cucumber Sushi and Salad

No matter how busy the restaurant gets – and it gets plenty busy so be sure to make a reservation – I’ve always been greeted promptly and in a friendly way, and seated quickly.  I’ve never waited long to be asked if I’d like to get things started off with a drink, and a follow-up food order follows soon thereafter.  Which leads us to the food…

The food is an interesting mix of traditional Japanese sushi, sashimi, and some izakaya dishes (karaage, for example), as well as some dishes with a Mexican twist (thus, presumably, the restaurant’s full name: “Japonessa Sushi Cocina”).  Unlike some restaurants’ Franken-hybrids, the savvy cooks at Japonessa have found a nice balance between the kick and boldness of Mexican and other Central/South American cuisine, and more traditional Japanese cuisine.

One successful Japa-Mex marriage was the ginger chicken with a crown of tortilla chips.  There was the power of the ginger, the softness of the chicken, the smoothness of the sauce, and the crunchiness of the chips.  The eel cucumber sushi was also lovely, offering a bold and initial jolt of flavour which melted away into a clean after-taste.

The cocktails were also lovely, and there is something for every palate and dish selection.

This is a solid restaurant with consistently good service, dishes, cocktails, and products.  It’s also incredible value when you take advantage of their happy hour deals (which I shamelessly do without reservation).  I know I’ll be back.
Japonessa Sushi Cocina on Urbanspoon

My yen for Italian comfort food continues, and brought me to Rione XIII, the lovely restaurant in the Capitol Hill area of Seattle.  The restaurant was recommended to me by a friend, and I’m grateful for it.

Tripe and Margherita
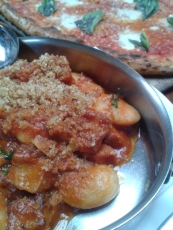
The atmosphere is chic without being casual, clean but not sterile.  The lighting, like the service, is warm and inviting.  We showed up around 5pm’ish (around happy hour…as luck would have it…) and we proceeded to gorge ourselves on what was on offer.  The stand-out dish was the tripa alla romana, a tripe and bean dish in a lovely, rich tomato sauce.  The tripe was well cooked – firm but not too chewy – and the flavours worked well together.

Next up was the margherita pizza.  The crust was chewy and not too crunch, and the tomato sauce was well seasoned and a nice little sweet and salty balancing act.  For some reason, I found the homemade mozzarella a little “meh”, but then the fried artichokes swooped in and saved the day.  All was washed down with some surprisingly wonderful cocktails:  Spritz (aperol, soda, and prosecco) and Americano (sweet Vermouth, Campari, and soda).

in terms of value, this was a very reasonable restaurant (though we, admittedly, enjoyed the benefits of a happy hour menu) and we both ate well for $50 (including drinks).  If ever you’re in the neighbourhood, I would definitely check out Rione XIII – a restaurant that scores high in terms of ambiance, value, and flavour.

Rione XIII on Urbanspoon

I’ve recently been on a pasta making binge.  It’s weird, but once Sunday rolls around I feel the need to roll out some dough, and eat some comfort food.  This past Sunday, I had some leftover eggs, cream, and bacon, and I though why not revisit an old friend:  Spaghetti alla Carbonara.

Spaghetti alla Carbonara.  It ain't much to look at...and then you taste it.

Some sources trace the etymology of the dish to the coal miners in Italy of days of yore, and that “carbonara” is a derivative of “carbonaro”, or charcoal burner.  This is quite appropriate, because mastering this recipe is all about mastering heat (you don’t want to overcook the eggs at get stuck with clumps of yolk rather than an unctuous sauce).  It has also been linked to an old Roman dish called “cacio e uova”, to which prosciutto was added later in the life of the dish.  A few other possibilities are proposed here.

Whatever its origins, there is something rather special about the creamy sauce and saltiness of the prosciutto (or bacon…though I prefer prosciutto) that hits the spot.  The recipe I’ve found to be a consistent winner is one I’ve adapted from the Chez Piggy Cookbook.  It serves 4.

INGREDIENTS

  • 1 Tbsp of olive oil
  • 6 Tbsp of finely diced onions
  • 150g of prosciutto, diced (or salty bacon if you’re in a jam)
  • 6 Tbsp of 35% cream
  • 1/4 cup freshly grated Parmesan cheese
  • 4-5 egg yolks (ideally organic eggs because they look pretty and taste better)
  • 500-600g of fresh pasta (do yourself a favour and make your own, or buy high quality dried pasta)

INSTRUCTIONS

While you prepare your ingredients, get a big pot of salted water to a rolling boil.  Harold McGee suggests using 10 times the pasta’s weight in water.  I concur.  There is nothing worst than using too little water, and losing that beautiful rolling boil the second your pasta hits it (and absorbs all of the heat).

Sauté the onions in a medium-hot frying pan until the start to soften and become translucent.  Then, add your prosciutto or bacon.

At this point, you should be adding your pasta to the boiling water and cook per the instructions.

Once your prosciutto turns a beautiful coral pink (or once your bacon is just cooked through), add the cheese and cream to the frying pan, and mix until well combined and heated up.  Turn off the heat.

In a separate, large bowl (and this is key because you want enough room to mix the other ingredients in later) add the egg yolks and mix enough to break them up into a nice, even orange paste but don’t mix to vigorously or else they’ll take in too much air.

Set aside about 5-7 Tbsp of the pasta water (this stuff is gold), strain your pasta, and then add the pasta to your bowl of egg yolks.  Coat your pasta with the yolks.  To do so, keep the pasta moving so that the yolks don’t get a chance to set.  You’re goal is a creamy sauce, not bits of hard boiled yolk.

Once coated evenly, add your cream/cheese sauce to the bowl with 2-3 tablespoons of the pasta water you saved (it will thicken the dish slightly) and mix well.  Serve it right away.

Lemonade with Lemon Tart.

Lemonade with Lemon Tart.

For years now, I have been making home-made lemonade.  There is nothing like fresh-pressed lemons, or even the bright smell of lemons on your hands after you’ve squeezed a half-dozen of those bad boys.  I was first inspired to try this by Hugh Fearnley-Whittingstall’s excellent River Cottage series.  The recipe he provides, and which I’ve reproduced in my own form below, is genius because it makes great tasting lemonade, and also because one can add his or her own twists to this classic drink.

INGREDIENTS

  • 6 organic lemons
  • 3/4 cups of sugar (more if you like your lemonade sweet, or if your lemons are unusually tart)
  • 1 cup of boiling water
  • 3 cups of cold water (or less if you want a more concentrated lemonade)

INSTRUCTIONS

First, wash away the wax on the outside of your lemons.  I like to dampen my hands with water ever so slightly, take a big handful of salt, and then rub/clean the lemons.  The salt is rough enough to remove the wax without damaging the skin of the lemons.

Next, grate away the outside of lemons and put what you get in a big bowl.  After you’re done that, cut your lemons in half, squeeze every bit of juice out of them (with a juicer, or by hand) and put the juice in with the grated lemon skins.

Dump in your sugar and then your cup of hot water.  Mix well to help the sugar dissolve in the liquid.  Let everything steep for about 30 minutes.  Strain the mixture to get rid of any of the rind/skin and skin.  What you will have is a lemonade base.  This is a beautiful thing, and you can do a number of things with it.

You can add the 3 cups of water I mentioned above, to make your garden variety lemonade.  If you want to make your lemonade more fizzy, add some Sprite or 7-Up instead of the water.  If you want it fizzy but less sweet, add some San Peligrino or other carbonated water instead of the water.  You can also add booze (Bourbon, Gin, and Vodka mix happily with the mix), or you can infuse your drink with mint, elder flowers, or other delicious fruits.

The only thing I would really recommend is that before your put in your water/Sprite/carbonated water/booze into the steeped mix, you should put in a little less than you think you’ll need.  The reason is that you’ll likely put in some ice cubes when you serve the drink, and these will melt and dilute your drink.  It’s always easy to add more water, but once it’s in you’re stuck with it.  Then again…you can always add some more of the concentrate.  Enjoy!

“Intimate” and “warm” are two words that spring to mind when I think of my most recent visit to Nook Restaurant on Denman Street in Vancouver.

The food in this Italian eatery is extremely satisfying.  We shared a number of dishes and all were unpretentious comfort dishes.

2014-03-07 19.01.07The appetizers/antipasto were beautiful.  Our burrata and pancetta plate disappeared in the blink of an eye, and I found that the healthy dose of pepper on the burrata cheese was a deft touch.  The true surprise of the night, however, was a chicken liver spread.  The creamy texture of the spread, crunchiness and seasoning of the toasted baguette on which it was served, and the knock-down punch of the big flavour was incredible.

The pizzas (a margherita and an Italian sausage) were fresh from the pizza oven, which ensured chewy loveliness at places and crunchiness in others.  The only downside was that they were slightly over-salted (IMHO) but I didn’t mind because it was an excuse to order a second glass of red wine.

Desert came.  The chocolate and salted caramel budino was a good idea, but (despite being a chocoholic) I much preferred the panna cotta, which was a refreshing way to end the meal.

I would certainly recommend Nook and will definitely return – but I’ll show up at the crack of 5pm to ensure that we’re seated quickly.

Nook on Urbanspoon

2014-02-23 15.00.48A proper winter has finally descended on the mountains of the Lower Mainland in British Columbia.  If you ask any winter outdoor enthusiast, it has been a long time coming.  There is nothing worst than long days without the prospect of snow in the mountains.  Well, all that changed this week, with 1.4m of snow falling in about 7 days.  Egg-cellent.  Before heading up to the mountains with friends, I thought I should prepare weapons-grade chocolate brownies to give us that little mental (and sugar) bump we’ll need in the early afternoon.  After much research, I’ve cobbled together some good ideas from a number of recipes, and added my own decadent twist to the noble brownie.

INGREDIENTS

  • 185g dark chocolate
  • 185g unsalted butter
  • 90g of all-purpose flour
  • 45g of cocoa powder
  • 1 cup of milk chocolate chips
  • 3/4 cup of Skor toffee bits (though you can substitute any other decadent bits to spike your brownies)
  • 3 large eggs
  • 200g of sugar
  • 1 tablespoon of vanilla extract

INSTRUCTIONS

1.  Start by setting your oven to 360F and letting it warm as you prepare the ingredients.  Butter the base and sides of a 20cm x 20cm brownie pan.

2.  Set up a bain marie, and as it warms up cut your chocolate and butter into pea-sized bits of awesome.  Stir the combination together in the bain marie as they melt together, until the mixture is uniform.  Remove from heat and let cool.

3.  While the chocolate-butter mixture is cooling, combine the flour and cocoa powder together in a bowl (I recommend using a sifter or a fine sieve to get rid of any clumps).

4.  Next, get out your electric whisk out, and combine your eggs and sugar together until you get a thick, aerated  batter (about 4-7 minutes).  This is a critical step.  You want to try to incorporate as much air as possible into the mixture.  You’ll notice the mixture’s colour lightening up as more air is incorporated.

5.  When your mix is complete, gently incorporate your melted chocolate mixture into the batter.  Once you have a uniform mix, add the vanilla extract and work in the flour-cocoa mixture until you get a creamy, consistent brownie mix.  Resist the temptation to simply pour the mixture directly into your mouth.

6.  What you now have is a typical brownie base.  Though I suggest a chocolate-Skor combination, feel free to switch things up (e.g., dark and white chocolate bits, chocolate and peanut butter bits, walnuts and chocolate…etc) because the batter will be able to handle it.  It’s like a delicious chocolate canvass.  For the purposes of this recipe, add the chocolate chips and Skor toffee bits into the brownies and gently mix until evenly dispersed into the mix.

7.  Bake your brownies for 25-35 minutes (depending on your oven).  You know they’re done if, after removing the brownies from the oven and giving them a giggle, the centre of the brownies do not wobble and you get a shiny layer on top of the brownies.  Let the brownies cool outside of the oven.  Then…get in there and if your feeling naughty add some vanilla ice cream.

This post is one of my early ones (from ages ago) and most popular ones, but I’ve always hated that it was full of typos (I’m a typo machine).  As such, and to satisfy myself that I’ve done this amazing recipe justice, I’ve decided to re-post it, as well as the explanation of the name.

Fish-Fragrant Pork SliversThe recipe below is my take on the one from a book called Sichuan Cookery by Fuchsia Dunlop, an authority on Chinese cooking in the West. I can honestly say that the result is fabulous – as is the cultural and culinary explanations that precede every recipe in her excellent book – however I found her writing to be imprecise and the instructions sloppy. The key to cooking this recipe (and most Chinese dishes, I imagine) is mise-en-place; you need to have your little bowls of seasoning and ingredients waiting to be tossed into the wok or frying pan (I use the latter).

So, where does the name come from?  According to Fuchia Dunlop’s book:

The so-called fish-fragrant is one of Sichuan’s most famous culinary creations, and it epitomizes the Sichauanese love for audacious combinations of flavour.  It is salty, sweet, sour, and spicy…  This delicious combination of flavours is thought to have originated in traditional Sichuanese fish cooking, which would explain why other ingredients prepared in teh same way would have instantly recalled the taste of fish, hence the name.  Some food experts, like the famous chef Xiao Jianming of Piaoxiang Restaurant in Chengdu, say the flavours conjure up the actual taste of tiny crucian carp (ji yu), which are widely eaten in Sichuan…  The term may also be connected with the fact that whole crucian carp, which are particularly delicious, are sometimes actually added to vats of pickling chillies to improve their taste.

Here’s what you need for this recipe (serves 3):

INGREDIENTS (BROKEN DOWN INTO HANDY BOWLS)

75ml of cooking oil (groundnut or peanut oil, or corn oil)

Pork
300g of lean pork, cut into thin 3mm x 3mm x 3cm slivers (“julienne” them)

Marinade
¼ teaspoon of salt
1 teaspoon of light soy sauce
1 tablespoon of cold water
1 tablespoon of potato flour (potato starch is a decent substitute)
1 teaspoon of Shaoxing wine (if you don’t have any, use sherry)

Sauce
1½ teaspoons of white sugar
1½ teaspoons of Chinkiang or black Chinese vinegar (balsamic vinegar will do)
¾ teaspoons of light soy sauce
½ teaspoons of salt
¾ teaspoon of potato flour (again, potato starch will do in a pinch)
3 tablespoons of stock (chicken) or water

Bowl 1
2 tablespoons of chilli paste

Bowl 2
2 teaspoons of finely chopped garlic
2 teaspoons of finely chopped ginger

Bowl 3
75g of bamboo shoots
1 handful of cloud-ear mushrooms

Bowl 4
1 spring onion, chopped

INSTRUCTIONS

Ok…get to work. First, chop up your meat, make the marinade, and then combine the two. Make sure to thoroughly coat your meat and let your it marinade for at least 30 minutes. If you have a rice cooker (if you don’t, buy one!) you can start making the rice.

Next, take your cloud-ear mushrooms (which will likely be dehydrated) and soak them in very hot water for 30 minutes. While the mushroom are hydrating, boil some more salted water and blanch the bamboo shoots for about a minute or so. Rinse them in cold water and then julienne them in slices similar in size to the pork.

Now, get to work preparing the contents of the other bowls, which should be self explanatory. Once the mushroom are ready, chop off any hard, nubby bits, and then slice them into strips the size of the pork and bamboo shots.

You should now be locked and loaded – which is good because the next step will be fast and furious. Season your wok (if you don’t your meat will stick) and heat up the 75ml of oil over high heat.

Once the oil is nice and hot, throw in your marinating meat and cook until the pieces are white on all sides (about 1-2 minutes). Then, keeping your wok over the heat, push your meat to one side of the wok and tilt the wok at about 30° so that the oil pools opposite the meat. Put your chilli paste into the oil (but not the meat). Mix up your paste/oil mix until well incorporated in the oil (about 30 seconds) and try not to let any meat drop into it.

Next, add the garlic and ginger in the chilli-oil mix until you can smell them.

This is the home stretch. Level your wok and rest it on the heating element. Throw in the bamboo shoots and cloud-ear mushrooms, and fry for 30 seconds. Stir in the sauce and mix quickly, then toss in the spring onions. Mix for about 10-20 seconds and serve immediately.

For some reason , adding booze to a desert seems to infuse it with a fun bit of naughtiness.  You could say the same about other kinds of food, with greater or lesser success.  Vodka-laced penne sauce?  Meh.  Brandy-soaked tiramisu?  I’ll take seconds, please.  In my quest to find an excuse to cook intelligently with booze,  I decided to combine Grand Marnier macerated fruit with this nice little Pavlova recipe.

This time 'round I left the whipped cream on the side to accommodate someone with a lactose intolerance.

This time ’round I left the whipped cream on the side to accommodate someone with a lactose intolerance.

A Pavlova, for those who don’t know, is said to have been named for a Russian dancer – Anna Pavlova – after her trip to Australia and New Zealand, which explains why the desert is so popular in that part of the world.  Below is a version of the recipe that I hope will make her – and my Kiwi relatives – proud.

INGREDIENTS

Meringue

  • 4 large egg whites (room temperature)
  • 1 1/4 cups white granulated sugar
  • 1 teaspoon of cream of corn starch
  • 1/2 teaspoon of vanilla extract

Whipping Cream

  • 2 cups of whipping cream
  • 1 tablespoon of white sugar

Boozy Fruit

  • 4 cups worth of assorted blueberries, raspberries, strawberries, and blackberries.
  • 2-3 tablespoons of Grand Marnier
  • 1-2 tablespoons of white sugar

INSTRUCTIONS

First, set your oven to 300F and line a cookie sheet with parchment paper.  In pencil, draw a 9-inch circle on the paper (you can just guestimate the diametre, and your circle doesn’t have to be perfect).

Next, prepare your fruit by placing them all in a deep bowl, and mixing in your Grand Marnier and sugar.  Feel free to put in less sugar if you want the desert to be less sweet – the Grand Marnier is already quite sugary.

While the fruit is absorbing the Grand Marnier and sugar, take you eggs and whisk them with an electric mixer until soft peaks start to form.  You know that you have soft peaks when you remove your whisk and the frothy peak forms but then droops back down.

Gradually add your sugar as you continue to beat the eggs until everything has combined.  I like to then gradually add my vanilla extract an corn starch at this stage, right before you can form firm peaks with your egg mixture.  Alternatively, you can gently (you don’t want to punch out any air) fold in the vanilla extract and corn start after you’ve hit the “firm peak stage”.  Do not beat beyond firms peaks.  You will know you’ve done so because your mixture will look dry and may leak some liquid.

At this point, if you’re ambitious you can put the mixture into a piping bag and make your Pavlova base, but I like to make mine with a large wooden spoon.  I do so by first by filling the 9-inch circle on my parchment paper with about 1/2 of the egg mixture.  Then, with the rest of the mixture, build up some wall on top of the outside of the meringue base so that you get a large, meringue basket.  The magic happens in the basket, ’cause this is where you’re going to pour in your boozy fruit and whipped cream.

Bake your Pavlova in the oven for 1 hour.  A trick I use is to actually keep the oven door slightly ajar with a wooden spoon that I’ve soaked ahead of time (to saturate it with water and make it less likely to burn/char).  You’ll know your Pavlova is properly cooked if you tap it and it sounds hollow.  Let the Pavlova cool in the oven with the door slightly ajar.

You’re almost done.  Right before serving, make whisk your whipped cream until it start to solidify and gradually add your sugar until you get your preferred consistency.  Place the cream in the middle of the Pavlova’s centre.  Then, drain your fruit (I recommend drinking the delicious boozy run-off…) and decorate your Pavlova.  The effect of the final product is quite lovely, and I can guarantee you’ll be amazed at the positive reactions and comments you get.

Also, this desert is fabulous for dinner parties because you can make the base up to 8 hours ahead of time…if you have the will power to leave it uneaten for that long.